INSTRUCTIONS FOR USE (AR-1611S)
ARTHREX WRIST TRACTION TOWER
Assembly Zusammensetzen Remontage Comporre Ensamblaje
ENGLISH
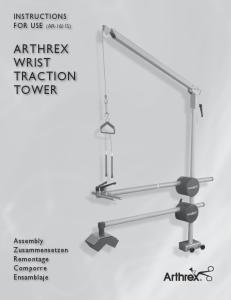
The Wrist Traction Tower facilitates arthroscopic surgery of the wrist by maintaining the arm in a position comfortable for the patient, as well as accessible to the surgeon. Traction forces control wrist distraction, through the sterile Finger Traps, by using weights applied to the main boom cable. In addition to providing a counter-traction force, the upperarm cradle post will help maintain a stable position of the wrist for operative procedures such as reduction of distal radius fractures and fixation with pins or external fixation. The radiolucent hand stabilizer post is fully adjustable to firmly hold the wrist in any position from full pronation to full supination. The radiolucent hand stabilizer post assembly can be removed from the main cross bar for autoclaving. The position of the upper arm cradle post and the radiolucent hand stabilizer post can be adjusted while the patient is in the supine position. Note: The upper arm cradle and foam insert are nonsterile and must be draped during surgery. Sterile Finger Traps are secured in the desired fashion and hooked onto the triangular finger distraction attachment. Traction weights are then applied to a cable which is attached to the distal end of the finger distraction attachment.
DEUTSCH
Das Handgelenk-Traktionssystem erleichtert arthroskopische Operationen am Handgelenk, indem der zu operierende Arm in einer für den Patienten komfortablen und für den Chirurgen gut zugänglichen Position festgehalten wird. Die Anwendung von Zugkräften kontrolliert die Handgelenksdistraktion; hierzu werden sterile Fingerhalter mit Gegengewichten am Kabel des Hauptaufhängers verbunden. Der Pfosten der Oberarmhalterung sorgt nicht nur für Gegenzug, sondern sorgt bei operativen Eingriffen (z.B. Reduktion von distalen Radiusfrakturen oder Fixation mit Stiften bzw. auf externe Weise) auch für eine stabile Position des Handgelenks. Der röntgendurchlässige Handstabilisatorpfosten kann so justiert werden, dass das Handgelenk sowohl in Bauch- als auch in Rückenlage auf jede beliebige Position eingestellt werden kann. Der röntgendurchlässige Handstabilisatorpfosten kann zum Autoklavieren vom Hauptbalken abgenommen werden. Der Pfosten der Oberarmhalterung und der röntgendurchlässige Handstabilisatorpfosten können justiert werden, während sich der Patient in Rückenlage befindet. Hinweis: Die Oberarmhalterung und die Schaumstoffeinlage sind unsteril und müssen während der Operation steril abgedeckt werden. Die sterilen Fingerhalter werden auf die bevorzugte Weise befestigt und am trapezförmigen Fingerdistraktionsteil eingehängt. Dann werden Traktionsgewichte an einem Kabel befestigt, das wiederum am distalen Ende des Fingerdistraktionsteils angebracht ist.
FRANCAIS
La tour de traction pour poignet facilite la chirurgie arthroscopique du poignet en maintenant le bras dans une position à la fois confortable pour le patient et accessible pour le chirurgien. La traction impose une distraction contrôlée du poignet via les doigtiers stériles au moyen de poids fixés au câble du bras principal. Outre le fait qu’il assure une force de contre-traction, le pivot de l’arceau pour bras maintient le poignet dans une position stable au cours de procédures chirurgicales telles que la réduction de fractures de la portion distale du radius et la fixation par broches ou la fixation externe. Le pivot de stabilisation de la main radiotransparent est totalement réglable afin de maintenir solidement le poignet dans n’importe quelle position, de la pronation maximale à la supination maximale. On peut démonter le pivot de stabilisation de la main de la barre transversale principale pour le stériliser à l’autoclave. Il est possible de régler la position du pivot de l’arceau pour bras et du pivot de stabilisation de la main radiotransparent lorsque le patient se trouve en décubitus dorsal. Remarque: L’arceau pour bras et l’insert en mousse sont non stériles et doivent être enveloppés dans des champs pendant l’intervention chirurgicale. Les doigtiers stériles se fixent de la manière souhaitée et s’accrochent à l’accessoire triangulaire pour distraction des doigts. On fixe ensuite des poids de traction à un câble fixé à l’extrémité distale de l’accessoire pour distraction des doigts.
ITALIANO
La Torre di trazione per polso agevola gli interventi artroscopici sul polso mantenendo il braccio in una posizione comoda per il paziente e, al tempo stesso, anche accessibile per il chirurgo. Le forze di trazione controllano la distrazione del polso, grazie alle trappole per dita sterili, mediante pesi applicati al cavo dell'asta principale. Oltre a fornire una forza di controtrazione, la sbarra del supporto del braccio aiuta a mantenere una posizione stabile del polso per interventi chirurgici come la riduzione di fratture del radio distale e il fissaggio con chiodi o fissaggio esterno. La sbarra dello stabilizzatore della mano radiolucente è interamente regolabile in modo da mantenere il polso saldamente in qualsiasi posizione, dalla pronazione piena alla supinazione completa. Il gruppo della sbarra dello stabilizzatore della mano radiolucente può essere rimosso dalla traversa principale per l'autoclavaggio. La posizione della sbarra del supporto del braccio e della sbarra dello stabilizzatore della mano radiolucente può essere regolata con il paziente in posizione supina. Nota: Il supporto del braccio e l'inserto in gommapiuma non sono sterili e devono essere coperti da teli chirurgici durante l'intervento. Le trappole per dita sterili sono fissate nel modo desiderato e agganciate sull'accessorio triangolare di distrazione delle dita. I pesi di trazione sono quindi applicati a un cavo che viene fissato all'estremità distale dell'accessorio di distrazione delle dita.
ESPAÑOL
La torre de tracción de muñeca sirve para mantener el brazo en una posición cómoda para el paciente y accesible para el cirujano durante operaciones artroscópicas. A través de los inmovilizadores esterilizados de los dedos, la tracción fuerza la distensión controlada de la muñeca mediante pesas situadas en el cable de extensión principal. Además de crear la fuerza de contra tracción, el poste del cabestrillo para el brazo superior ayuda a mantener la muñeca en una posición estable durante operaciones tales como las reducciones de fracturas del radio distal y las fijaciones con clavos o externas. El poste estabilizador radiotransparente para la mano se puede ajustar como se necesite para sujetar la muñeca en cualquier posición, desde pronación hasta decúbito supino. El poste estabilizador completo se puede desmontar del eje principal para esterilizarlo por autoclave. La posición del poste del cabestrillo para el brazo superior y el poste estabilizador radiotransparente se pueden ajustar con el paciente en decúbito supino. Nota: El cabestrillo y la espuma en su interior no están esterilizados y deben permanecer cubiertos durante toda la operación quirúrgica. Los inmovilizadores estériles de los dedos se cierran como se necesite y se enganchan al accesorio triangular de distensión de los dedos. Las pesas de tracción se aplican al cable conectado al extremo distal del accesorio de distensión de los dedos.
1
2
3
ENGLISH Instructions for use:
1. Slide the boom cable down into the vertical
upright beam. Seat the beam up inside the boom hinge.
2. Once assembled, swing the boom to the desired
3. Place the upper lip of the Clark Rail Adapter
2. Den Aufhänger nach der Montage zur gewünsch-
3. Die obere Lippe des Clark-Schienenadapters auf
2. Après assemblage, faire pivoter le bras pour
3. Placer la lèvre supérieure de l’adaptateur pour
radial position and turn the knob clockwise to lock it into position.
over the Clark Rail. Flip the base teeth up and tighten the two knobs for firm fixation to the Clark Rail.
DEUTSCH Gebrauchsanweisung:
1. Das Aufhängerkabel in die vertikal
ausgerichtete Stange schieben. Die Stange im Aufhängerscharnier aufrichten.
ten radialen Position schwenken und den Knopf im Uhrzeigersinn festdrehen.
FRANCAIS
der Clark-Schiene anbringen. Die Sockelzähne nach oben drücken und die beiden Knöpfe zur sicheren Befestigung an der Clark-Schiene festziehen.
Mode d'emploi:
1. Glisser le câble du bras vers le bas dans le
montant vertical. Fixer le haut du montant dans la charnière du bras.
l’amener dans la position radiale souhaitée et tourner la molette dans le sens des aiguilles d’une montre pour le verrouiller en position.
rail de Clark sur le rail de Clark. Amener les dents inférieures vers le haut et serrer les deux molettes pour le fixer solidement au rail de Clark.
2. Una volta montata, spostare l'asta nella posizione
3. Collocare il bordo superiore dell'adattatore per
2. Una vez lo haya hecho, coloque el extensor en
3. Ponga el reborde superior del adaptador de
ITALIANO
Istruzioni per l'uso:
1. Far scorrere il cavo dell'asta in giù nella sbarra
verticale diritta. Posizionare la sbarra all'interno del cardine dell'asta.
radiale desiderata e ruotare la manopola in senso orario per fissarla in posizione.
guida Clark sulla guida Clark. Spostare in su i denti della base e serrare le due manopole per il fissaggio sicuro sulla guida Clark.
ESPAÑOL Instrucciones de uso:
1. Baje el cable extensor por la varilla vertical. Asiente la varilla en el interior del extensor.
la posición radial deseada y gire la perilla hacia la derecha para fijarlo.
carriles Clark sobre el carril. Gire hacia arriba los dientes base y apriete las dos perillas para inmovilizar el carril.
4
5
6
4. Insert the autoclavable, radiolucent hand
5. Tighten the knob in the clockwise direction, to
6. Loosen the adjusting handles counterclock-
4. Den autoklavierbaren, röntgendurchlässigen
5. Den Knopf im Uhrzeigersinn festdrehen,
6. Die Justiergriffe gegen den Uhrzeigersinn
bis der Pfosten im justierbaren horizontalen Arm arretiert ist.
aufdrehen und die Arme in die gewünschte Position bringen. Beide Arme können nach innen oder außen, nach oben oder unten sowie seitlich justiert werden. Hinweis: Die Position der Hebel lässt sich einstellen; hierzu den Daumen auf dem Schraubpfosten platzieren, den Hebel vom Pfosten weg nach außen ziehen und nach links oder rechts drehen.
5. Serrer la molette dans le sens des aiguilles d’une
6. Desserrer les poignées de réglage en sens inverse
montre pour verrouiller le pivot dans le bras horizontal réglable.
des aiguilles d’une montre et régler les bras dans la position souhaitée. Les deux bras peuvent être ajustés vers l’intérieur ou vers l’extérieur, vers le haut ou vers le bas et côte à côte. Remarque: On peut régler la position des leviers en plaçant le pouce sur le pivot de la vis, en tirant le levier hors du pivot et en tournant le levier vers la gauche ou vers la droite.
5. Serrare la manopola in senso orario per fissare
6. Allentare le impugnature di regolazione in senso
la sbarra nel braccio di regolazione orizzontale.
antiorario e regolare i bracci nella posizione desiderata. Entrambi i bracci sono regolabili in dentro, in fuori, in alto o in basso e da lato a lato. Nota: Per regolare la posizione delle leve collocare il pollice sulla sbarra a vite, tirare la leva fuori dalla sbarra e ruotare la leva a sinistra o a destra.
5. Gire la perilla hacia la derecha para fijar el poste
6. Gire las asas de ajuste hacia la izquierda para aflo-
stabilizer post into the adjustable horizontal arm. While inserting, be sure to line up the two snap buttons with the correlating holes in the horizontal adjustment arm. The post will snap into the horizontal adjustment arm. See Arthrex DFU0023 for autoclaving instructions.
Handstabilisatorpfosten in den justierbaren horizontalen Arm einsetzen. Beim Einsetzen darauf achten, dass die beiden Druckknöpfe mit den entsprechenden Löchern im horizontalen Justierarm plan ausgerichtet sind. Der Pfosten schnappt dann in den horizontalen Justierarm ein. Autoklavieranweisungen, siehe Arthrex DFU-0023.
4. Insérer le pivot de stabilisation de la main radio-
transparent autoclavable dans le bras horizontal réglable. Lors de son insertion, veiller à aligner les deux boutons d’enclenchement avec les trous correspondants du bras de réglage horizontal. Le pivot s’enclenche dans le bras de réglage horizontal. Se référer au document Arthrex DFU-0023 pour des instructions concernant la stérilisation à l’autoclave.
4. Inserire la sbarra dello stabilizzatore per
mano radiolucente autoclavabile nel braccio orizzontale regolabile. Durante l'inserimento, allineare i due pulsanti di attacco con i fori corrispondenti nel braccio di regolazione orizzontale. La sbarra scatta in posizione nel braccio di regolazione orizzontale. Vedere le Istruzioni per l'uso Arthrex DFU-0023 per indicazioni sull'autoclavaggio.
4. Inserte el poste estabilizador radiotransparente
para la mano en el brazo horizontal ajustable. Mientras lo hace, alinee los dos corchetes con los orificios correspondientes del brazo. El poste estabilizador entrará en el brazo ajustable. Las instrucciones para la esterilización con autoclave las encontrará en Arthrex DFU-0023.
lock the post into the adjustable horizontal arm.
estabilizador en el brazo ajustable horizontal.
wise and adjust the arms to the desired position. Both arms can be adjusted in or out, up or down, and side to side. Note: The position of the levers is adjustable by placing your thumb on the screw post, pulling the lever out from the post, and turning the lever to the left or to the right.
jarlas y coloque los brazos en la posición deseada. Ambos brazos se pueden abrir o cerrar, subir o bajar y mover de un lado a otro. Nota: Para cambiar la posición de las palancas, ponga el pulgar en el tornillo del poste, separe la palanca del mismo y gírela hacia la derecha o hacia la izquierda.
Steps continue Schritte (Fortsetzung)
Suite des étapes Segue Continuación de los pasos
7
8
9
ENGLISH Instructions for use:
7. Attach the nonsterile Foam Insert (AR-1615) to the upper arm cradle.
8. Attach the autoclavable Finger Distraction Attachment (AR-1614, sold separately).
Gebrauchsanweisung: an der Oberarmhalterung anbringen.
8. Das autoklavierbare Fingerdistraktionsteil befestigen (AR-1614, separat erhältlich).
Mode d'emploi: (AR-1615) à l’arceau pour bras supérieur.
8. Fixer l’accessoire de distraction des doigts autoclavable (AR-1614, vendu séparément).
Istruzioni per l'uso: (AR-1615) sul supporto del braccio.
8. Attaccare l'accessorio di distrazione per dita autoclavabile (AR-1614, venduto a parte).
Instrucciones de uso: el cabestrillo para el brazo superior.
9. Facultatif: Utiliser l’accessoire échelle de traction (AR-1604, vendu séparément) entre l’accessoire de distraction des doigts et le câble.
9. Opzionale: Usare l'accessorio della bilan-
cia di trazione (AR-1604, venduto a parte), fra l'accessorio di distrazione delle dita e il cavo. Fissare i pesi all'estremità del cavo in fondo alla sbarra verticale diritta.
ESPAÑOL
7. Inserte la espuma no esterilizada (AR-1615) en
(AR-1604, separat erhältlich) zwischen dem Fingerdistraktionsteil und dem Kabel verwenden.
Fixer des poids à l’extrémité du câble au bas du montant vertical.
ITALIANO
7. Attaccare l'inserto in gommapiuma non sterile
9. Optional: Das Traktionsskalenteil
Die Gewichte an den Kabelenden unterhalb der vertikal ausgerichteten Stange befestigen.
FRANCAIS
7. Fixer l’insert en mousse non stérile
(AR-1604, sold separately), between the Finger Distraction Attachment and the cable. Attach weights to the cable end at the bottom of the vertical upright beam.
DEUTSCH
7. Die unsterile Schaumeinlage (AR-1615)
9. Optional: Use the Traction Scale Attachment
8. Instale el accesorio de distensión de los dedos
esterilizable por autoclave (AR-1614, se vende por separado).
9. Opcional: Utilice la escala de tracción
(AR-1604, se vende por separado) entre el accesorio de distensión de los dedos y el cable. Instale las pesas al final del cable en la parte inferior de la varilla vertical.
0086
Arthrex, Inc. 1370 Creekside Boulevard, Naples, Florida 34108-1945 USA Tel: 800-934-4404 • www.arthrex.com Arthrex GmbH Erwin-Hielscher-Strasse 9 81249 München, Germany Tel: +49 89 909005-0 • www.arthrex.de © 2009, Arthrex Inc. All rights reserved. LAI1611S, rev. 3